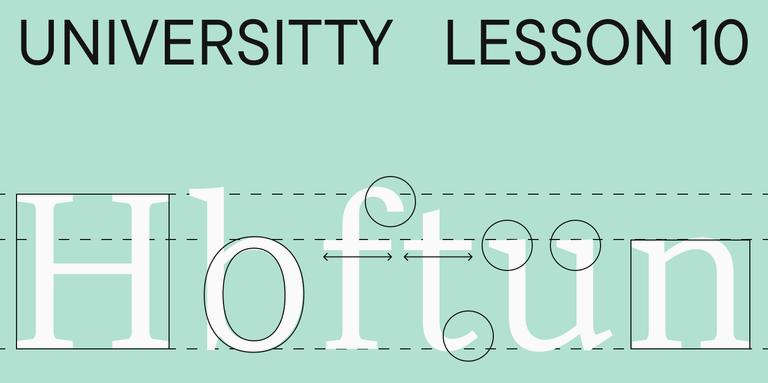
¡Bienvenido a la séptima lección de nuestra «UniversiTTy»! Este artículo continúa nuestra fascinante exploración del proceso de creación de fuentes. Te recomendamos revisar los artículos anteriores de la serie antes de sumergirte en este.
Hoy seguiremos hablando de las compensaciones ópticas, descubriremos cómo determinar las alturas de los caracteres en mayúsculas y minúsculas, y profundizaremos en la esencia del contraste. Antonina Zhulkova, líder de diseño en TypeType, te explicará todos estos procesos. Antonina lleva más de 5 años trabajando en el diseño tipográfico. Es autora conceptual y diseñadora principal de proyectos como TT Neoris, TT Ricordi Allegria, TT Globs e Ivi Sans Display. Además, ha participado en la creación de TT Fellows, TT Fors, TT Interphases Pro, TT Commons y muchas otras fuentes.
Compensaciones ópticas: Peso y altura de los caracteres
En el artículo anterior, nos centramos en que los trazos diagonales de los caracteres triangulares deben ser un poco más delgados que el grosor del asta principal de la letra H y en que cada letra debe colocarse junto a las demás para realizar pruebas. Casi todos los caracteres triangulares con trazos diagonales tienen puntos de intersección donde estos se cruzan, lo que siempre da la impresión de mayor grosor (esto también ocurre en letras como B, M, N, R, etc.). Por ello, es necesario equilibrarlos reduciendo el peso de los trazos en la zona de intersección.
Otro aspecto fundamental a tener en cuenta es la diferencia visual en la percepción de los trazos ascendentes y descendentes. Los trazos ascendentes son líneas diagonales que siguen un flujo lógico de abajo hacia arriba (por ejemplo, el trazo izquierdo de la letra A), mientras que los trazos descendentes siguen la lógica opuesta y van de arriba hacia abajo (como el trazo derecho de la letra A). Para los diseñadores de fuentes principiantes, puede resultar complicado recordar a qué tipo (ascendente o descendente) pertenece cada trazo diagonal. Mi consejo es dibujar la letra en un papel con cualquier herramienta: el movimiento natural de la mano te indicará cómo deben progresar los trazos.
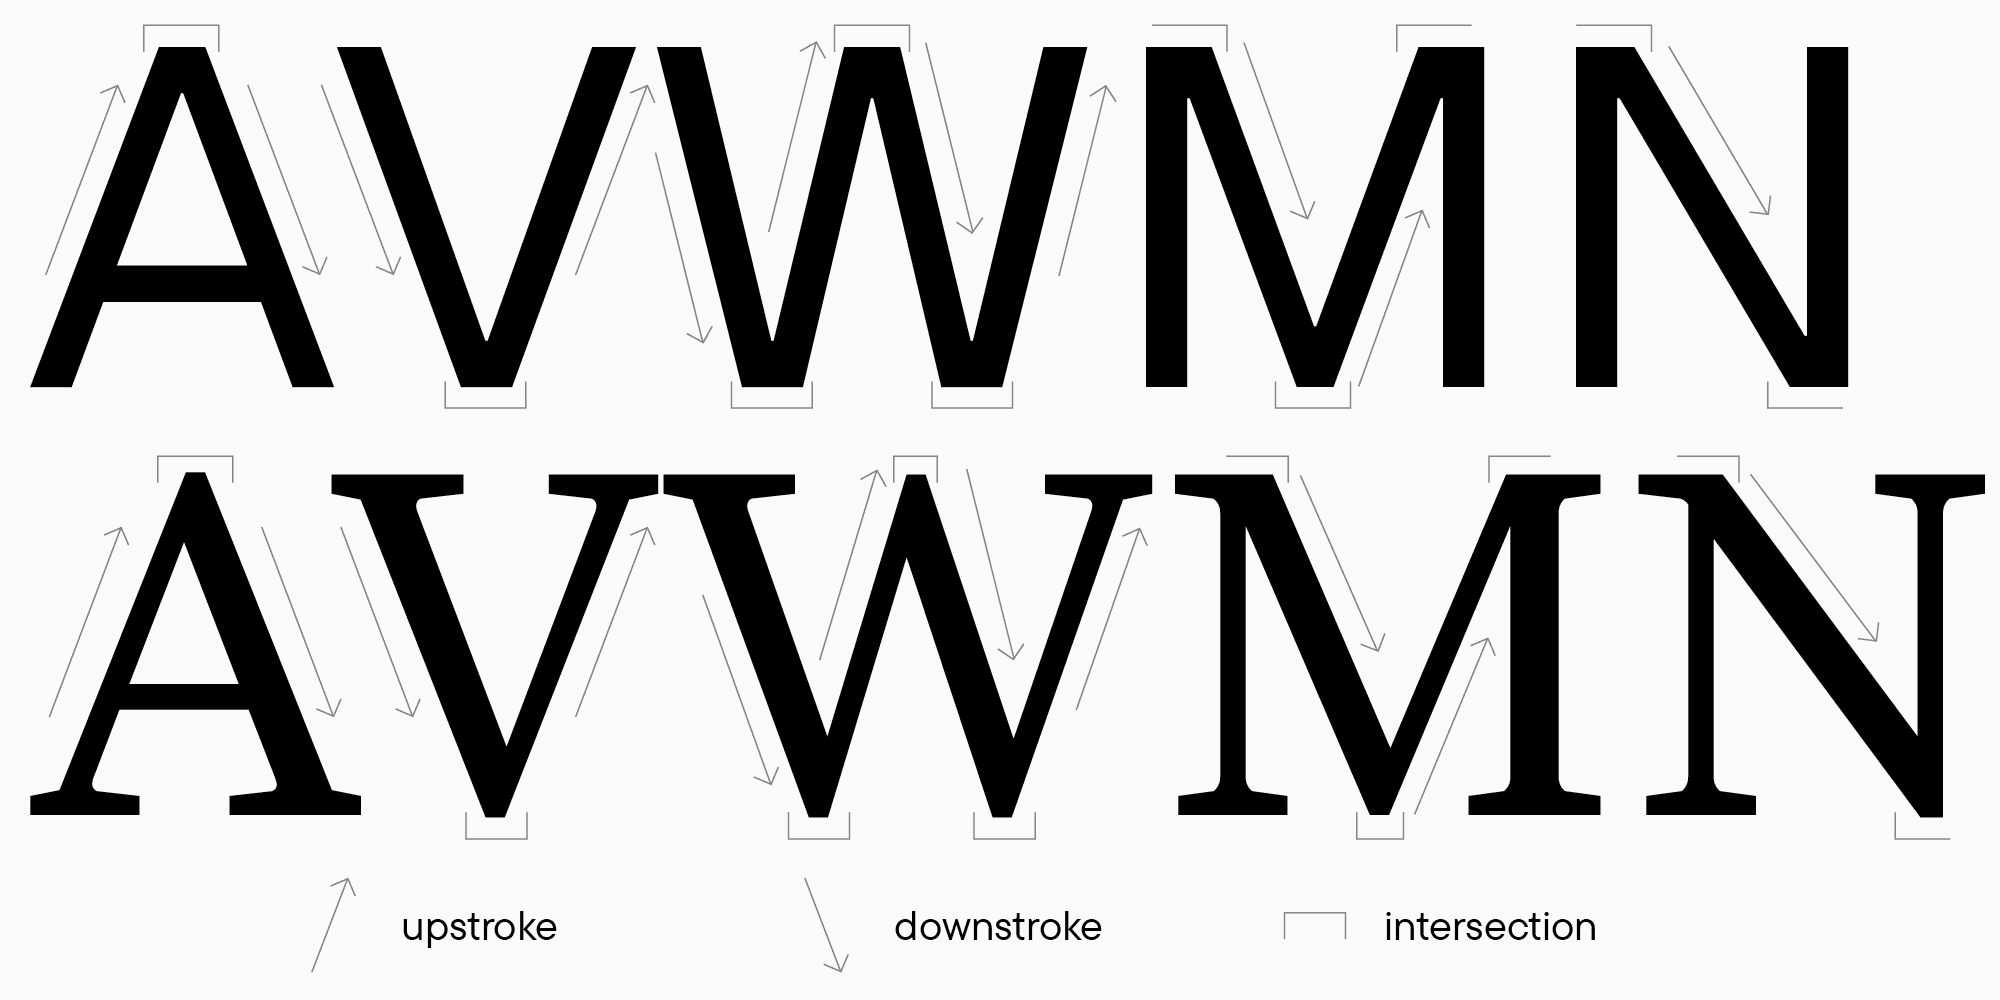
Los trazos ascendentes parecen más pesados (gruesos) debido a su movimiento ascendente, que visualmente atrae más la atención. Esto se debe a que leemos de izquierda a derecha, y las líneas que se mueven en dirección opuesta captan más nuestra mirada. Por esta razón, en las sans serif, donde el contraste no es tan pronunciado, los trazos descendentes siempre se diseñan ligeramente más gruesos que los ascendentes. En las tipografías con serifas, la diferencia de peso entre los trazos ascendentes y descendentes es más notable: los trazos ascendentes suelen ser delgados, mientras que los descendentes son pesados. Este principio también depende de la tradición caligráfica.
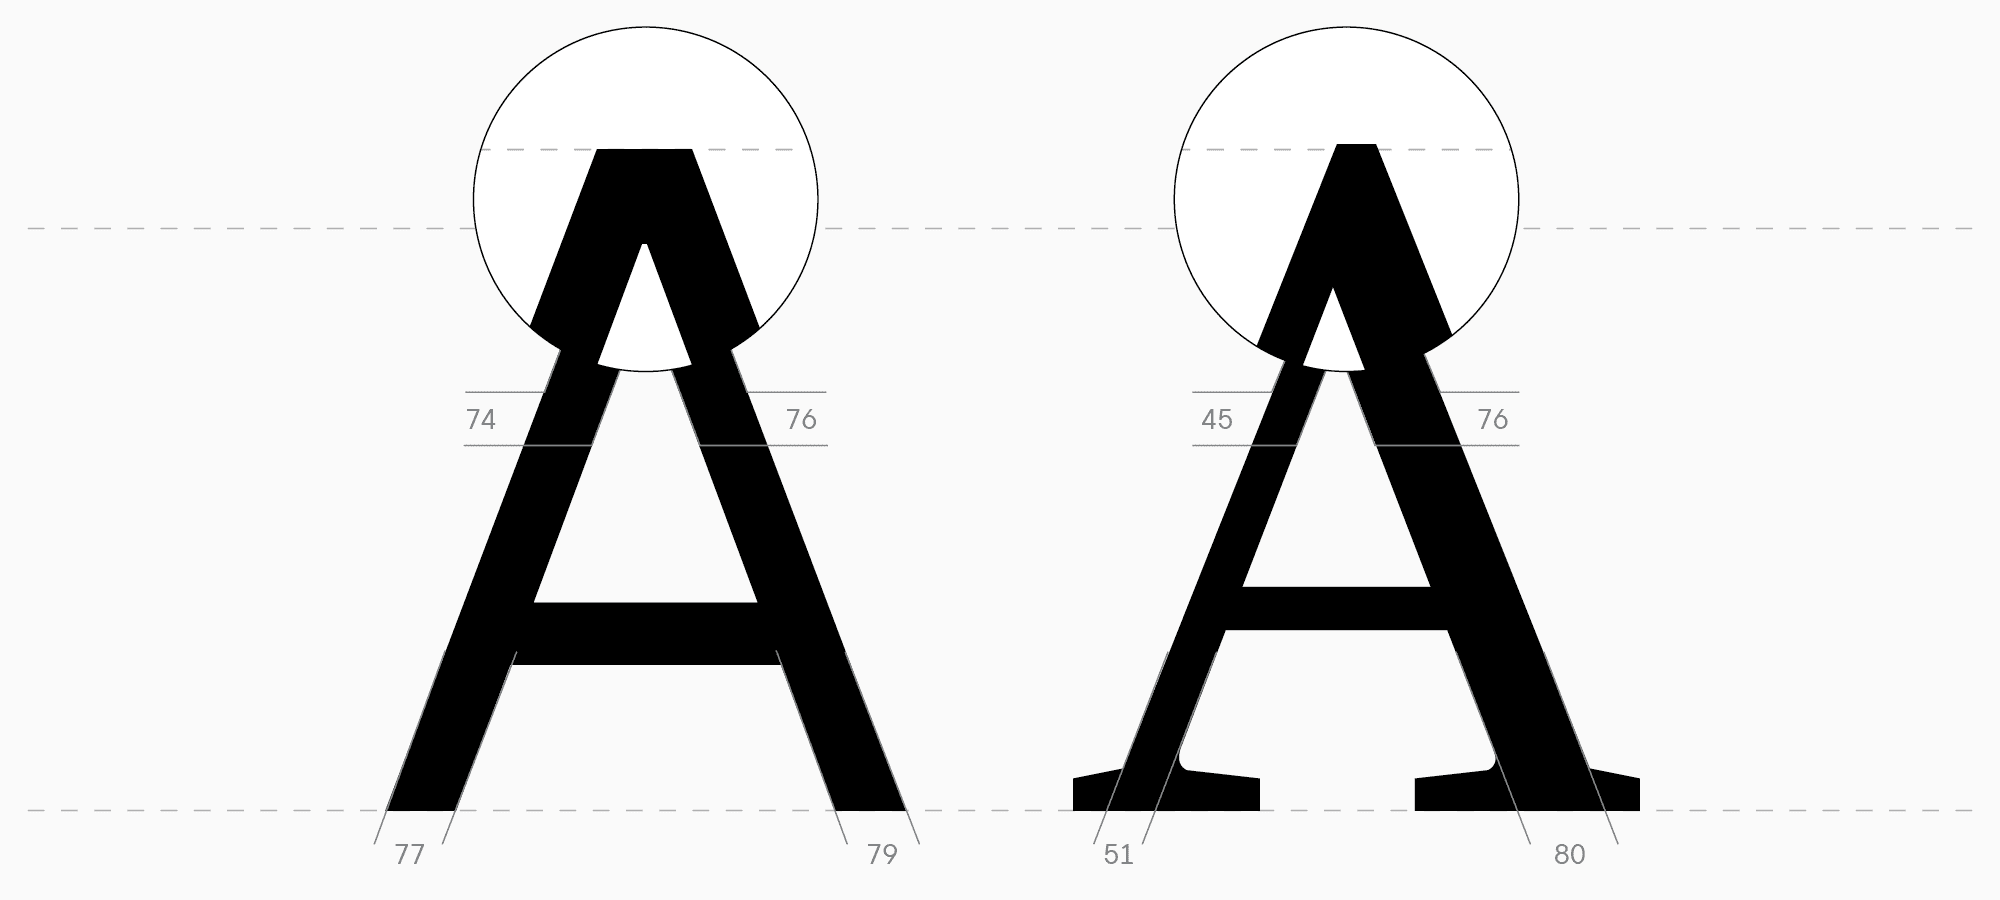
Volvamos ahora a nuestras formas geométricas. La altura de los caracteres triangulares también debe determinarse en comparación con otras formas. El punto donde los trazos horizontales se cruzan tiene menos densidad de negro, lo que visualmente lo hace parecer más ligero y da la impresión de que el glifo es más bajo que los demás. Para compensarlo, se pueden aplicar dos estrategias de diseño. La primera consiste en realizar un corte horizontal en el punto de intersección (recortar la parte superior del triángulo). La segunda opción es extender el vértice o ápice afilado por encima de la altura de las letras verticales. Los ejemplos de sans serif y serifas ilustran claramente todos estos detalles.
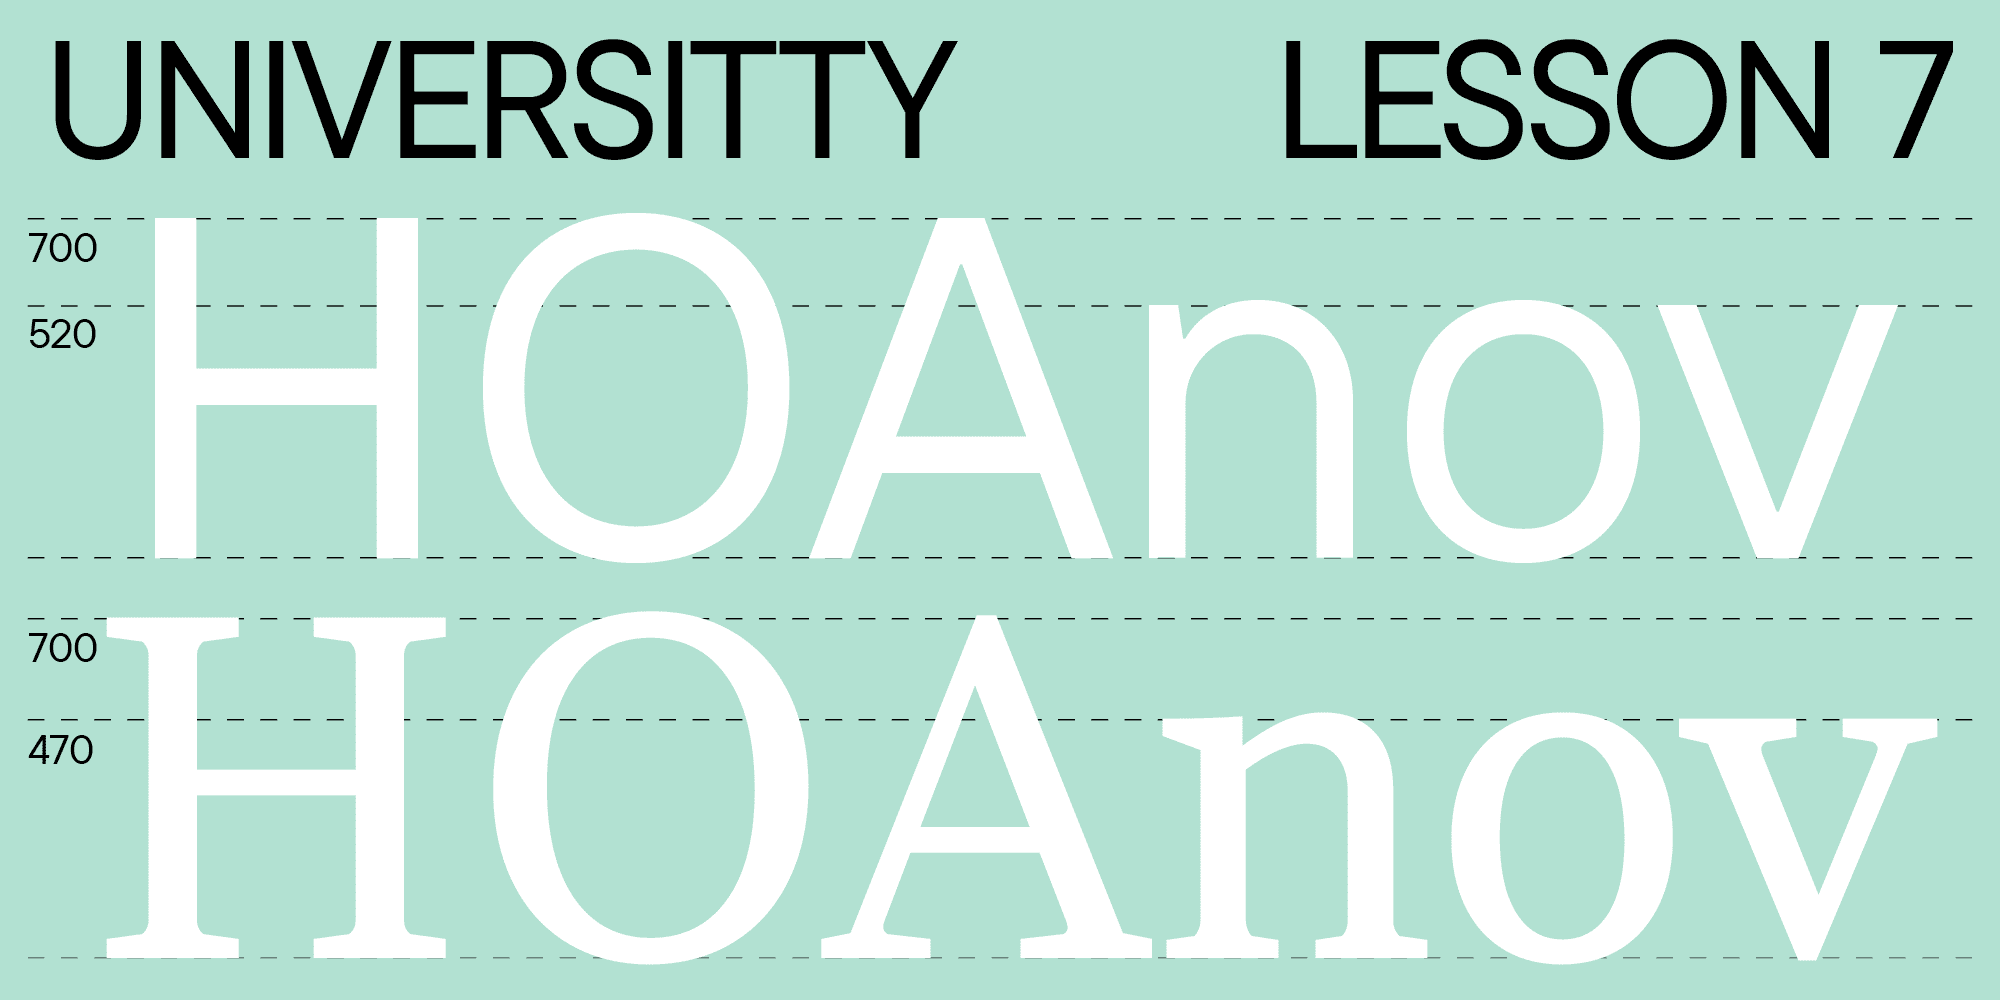
Al determinar los pesos, también puedes utilizar tus bocetos para definir la altura de los caracteres en mayúsculas y minúsculas, así como el nivel de compensaciones visuales. Como resultado, deberías obtener varios valores básicos que servirán de referencia en tu proceso de diseño:

- La altura de los caracteres en mayúsculas, que corresponde a la altura de la letra H. Cada diseñador tipográfico aplica su propia lógica para definir esta medida, pero generalmente oscila entre 680 y 730 puntos. Si la fuente está destinada a un propósito específico (por ejemplo, uso en interfaces), se recomienda analizar fuentes de la competencia para alinearla con ellas.
- El grosor del asta en los caracteres mayúsculos verticales (H).
- El grosor del asta en los caracteres redondeados (O), y si este difiere del grosor del asta de la letra H, así como en qué medida. La diferencia de pesos puede determinarse probando los glifos en un bloque de texto. Para ello, transfiere varios caracteres desde los bocetos al software de edición tipográfica y pruébalos en palabras y texto corrido, ajustando los tamaños en puntos hasta encontrar el equilibrio óptimo.
- La profundidad del voladizo en los caracteres redondeados.
- El grosor de los trazos diagonales (A).
- El grosor de los trazos horizontales (en H, A y O), y si difieren entre sí, en qué medida.
- La altura de los caracteres en minúscula, determinada por la altura de la letra n o x (sin contar el arco, que a menudo se iguala con la profundidad del voladizo). En los editores tipográficos, el tamaño estándar para la altura de los caracteres en minúscula suele ser de 500 puntos (y 700 puntos para las mayúsculas), lo que puede servir como punto de partida. Para definir la altura de los glifos en minúscula, utiliza tus bocetos y ten en cuenta la clasificación tipográfica de la fuente. En las serifas clásicas de estilo antiguo (Old Style), los caracteres en minúscula suelen ser relativamente bajos. En fuentes neutrales, las minúsculas suelen diseñarse un poco más grandes para mejorar la legibilidad, ajustando el tamaño de los ascendentes para que no parezcan demasiado pequeños. En cambio, en las fuentes de exhibición (display), el tamaño de las minúsculas puede variar libremente para enfatizar mejor la idea gráfica.

- El grosor del asta en los caracteres verticales, como la n, y en los caracteres redondeados, como la o, así como el grosor de los trazos diagonales en la v, deben ser más ligeros que los de los caracteres en mayúscula para lograr una composición tipográfica más equilibrada. Sin embargo, es fundamental que mantengan una relación coherente con los valores de los glifos en mayúscula.
- La profundidad del voladizo en los caracteres redondeados suele coincidir con la profundidad del voladizo en mayúsculas. No obstante, en algunas fuentes o estilos tipográficos, este parámetro puede ser menor en los caracteres en minúscula. Para determinar el valor óptimo, es necesario probar la fuente observando la suavidad y consistencia de la línea tipográfica.
- Las alturas de los ascendentes y descendentes deben calcularse después de establecer los principales parámetros de altura de los caracteres en minúscula. Desde un punto de vista gráfico, la mejor decisión es mantener alturas similares para los ascendentes y descendentes, evitando que los ascendentes sean significativamente más altos o más bajos que las mayúsculas. Más adelante, en este artículo profundizaré en los tamaños y formas de los ascendentes y descendentes.
Los valores se expresan en función de 1000 unidades por Em, una unidad de medida utilizada en tipografía y diseño de fuentes. Representa la cantidad de puntos en un Em-square, un espacio abstracto cuya altura indica la distancia estimada entre líneas de texto con el mismo tamaño de fuente. Esta es la cuadrícula y el número de puntos que se utilizan al dibujar los glifos. La cuadrícu 1f40 la más comúnmente empleada es la de 1000 puntos, aunque también existen cuadrículas de 1024, 2048 y otros valores. Este parámetro se encuentra dentro del archivo de fuente, en la pestaña Font info.
Todos estos valores sirven como base y deben mantenerse uniformes en los demás caracteres según el grupo al que pertenezcan: verticales, redondeados o triangulares. Es importante aplicar compensaciones especiales en los diferentes grosores de los glifos para equilibrar la densidad del negro. Esta misma recomendación se aplica a los caracteres con múltiples trazos y a los estilos de fuente en negrita.
Ahora es momento de volver a nuestra sans serif neutral para interfaces y a la tipografía con serifas que estábamos creando, y observar cómo se implementan todas estas alturas en ellas.
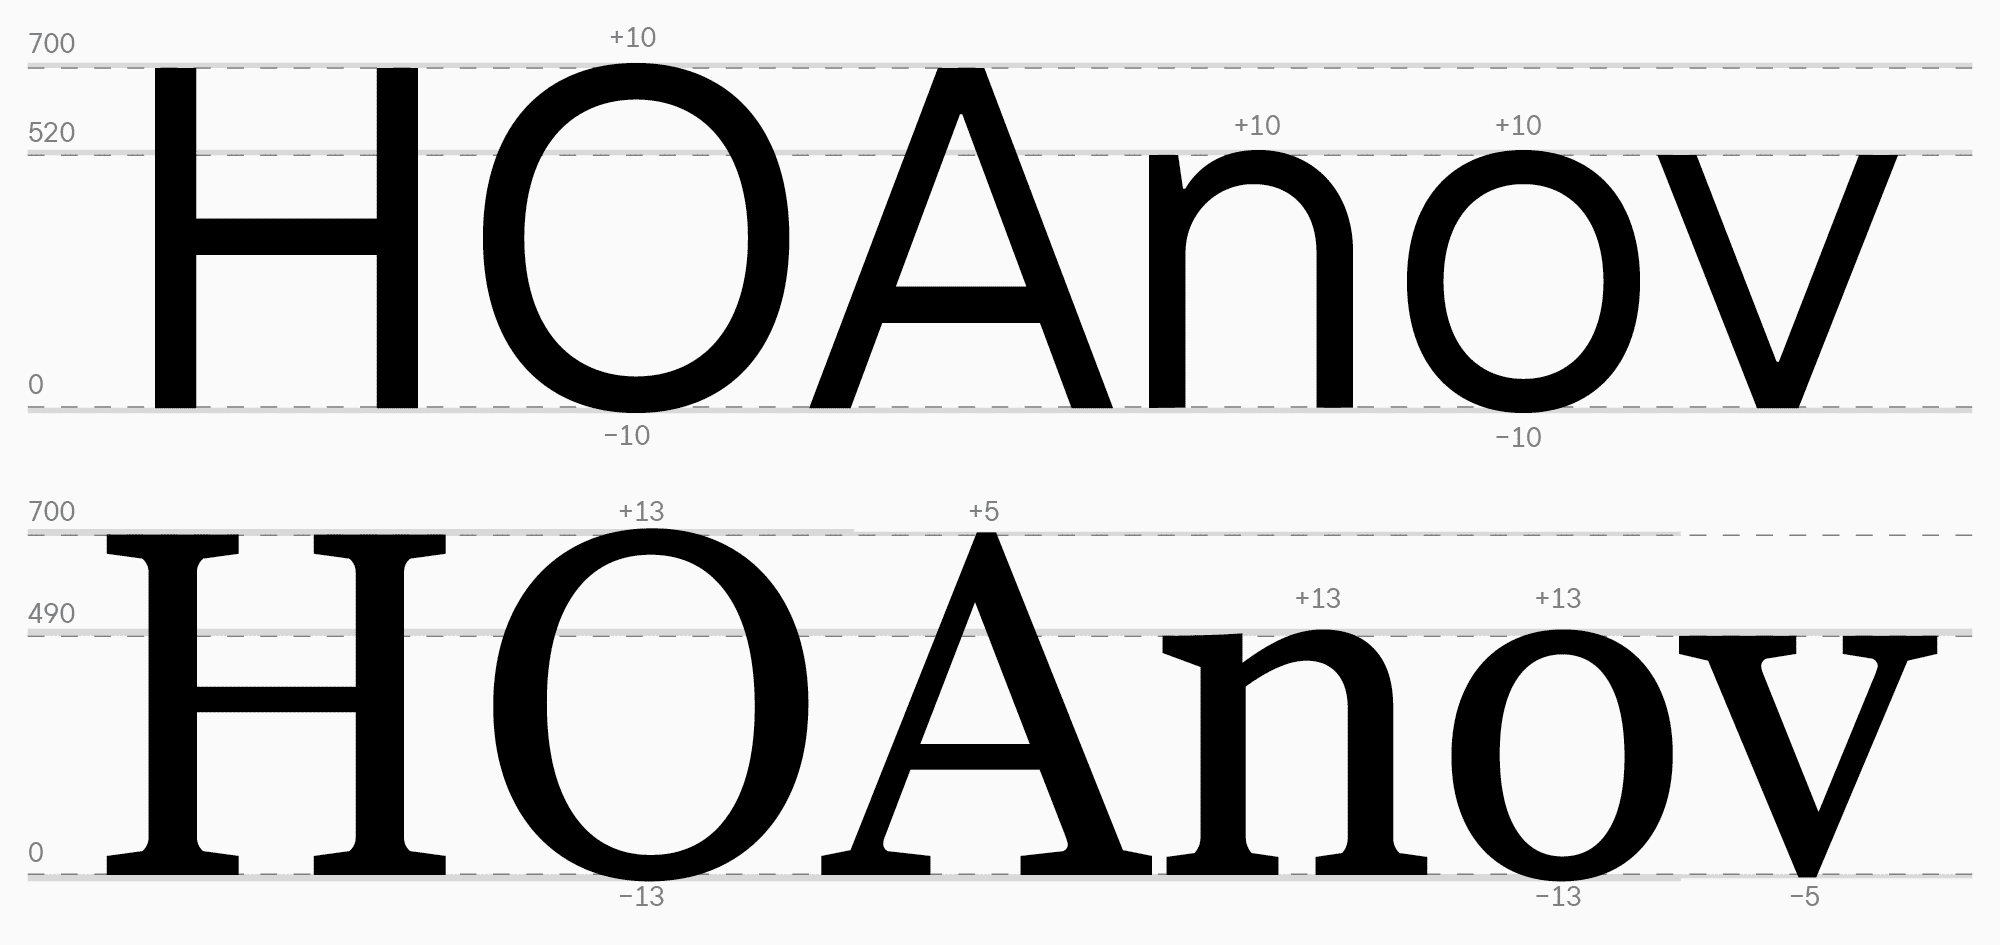
La tarea principal al trabajar con pesos y alturas es probar constantemente las letras en textos y compararlas entre sí. Es fundamental mantener el equilibrio entre el negro y el blanco dentro de los parámetros elegidos. Los glifos no deben parecer fuera de lugar, y los pesos deben ajustarse al propósito y concepto principal de la fuente.
Al construir una fuente, es importante lograr una consistencia en la densidad del negro y el blanco de los caracteres para garantizar una apariencia uniforme en el texto.
Contraste
El contraste es un elemento visual fundamental en el diseño de cualquier glifo. Todas las fuentes tienen un parámetro de contraste, y al modificarlo se pueden lograr efectos completamente diferentes en el diseño de los caracteres. El contraste se define por la relación entre los grosores de los trazos primarios y secundarios. Generalmente, este término hace referencia a la diferencia entre las astas y los trazos horizontales.
Existen varias propiedades del contraste:
- Intensidad del contraste. La intensidad del contraste puede variar en las fuentes, desde un contraste casi inexistente en las sans serif neutras hasta un alto contraste en las serifas modernas. También existe el contraste inverso.

- Tipo de contraste. Esta propiedad indica qué herramienta de escritura influye en la forma del glifo. Es un aspecto clave en las fuentes con contraste, ya que la estructura de los caracteres depende de la categoría tipográfica. Cuantas más características históricas tenga la fuente, más evidente será la influencia de la herramienta en sus formas. Existen tres tipos de contraste: Contraste de pluma ancha, que implica un alto nivel de contraste. Contraste de pluma puntiaguda, que sugiere lo contrario, es decir, un contraste bajo. Contraste de transición, que se encuentra lógicamente entre ambos y es característico de las serifas transicionales.

El contraste es especialmente relevante en las fuentes con serifas. Seguir las reglas de distribución del contraste nos permite identificar que una fuente pertenece a esta categoría y determinar cómo debe evaluarse. Para diseñar una buena fuente con serifas, se recomienda practicar caligrafía, explorar referencias históricas (por ejemplo, en https://letterformarchive.org/) o buscando especímenes tipográficos en https://archive.org/), analizar fuentes modernas populares y leer libros sobre caligrafía y tipografía. Para profundizar en el estudio de los trazos, el contraste y los pesos, una excelente referencia es el libro de Gerrit Noordzij, The Stroke: Theory of Writing.

Tu fuente debe mantener coherencia, por lo que es fundamental adherirse a los parámetros de contraste elegidos. De lo contrario, la fuente perderá su integridad y se percibirá como un conjunto de letras inconexas en luga 1f40 r de un sistema tipográfico unificado. Sin embargo, comprender el contraste no solo impone restricciones, sino que también es una herramienta valiosa para el diseño de glifos. Las reglas de distribución del contraste pueden utilizarse para manipular la forma gráfica y crear fuentes llamativas y poco convencionales. Por ejemplo, las fuentes con contraste inverso nunca pasan de moda. Aplicar contraste de manera selectiva en caracteres específicos puede aportar un toque distintivo a la fuente, mientras que aumentar el contraste en diferentes estilos tipográficos amplía sus posibilidades de aplicación. La transgresión intencionada de estas reglas confiere singularidad a las fuentes y convierte al contraste en una de las herramientas más poderosas del diseño tipográfico.

Tamaños ópticos
Antes de comenzar a esbozar los glifos, es fundamental elegir el tamaño de fuente adecuado para su uso. Este parámetro influye directamente en la apariencia de los caracteres. En este artículo, cubrimos solo los aspectos más esenciales para comenzar con el diseño tipográfico, pero en próximos materiales profundizaremos más en los tamaños ópticos.
El tamaño en puntos más utilizado determina la percepción visual de los contornos: a medida que aumenta el tamaño de los caracteres, el contorno debe volverse más detallado. Esta es la principal diferencia entre las fuentes de texto y las de exhibición. Si la fuente está destinada a usarse en tamaños pequeños, su tarea principal será transmitir la imagen general, priorizando la densidad del texto y el ritmo sobre los detalles, que podrían no ser visibles en tamaños reducidos. En cambio, en las fuentes de exhibición, los elementos gráficos de cada letra adquieren mayor protagonismo, y el nivel de detalle se convierte en un aspecto central.
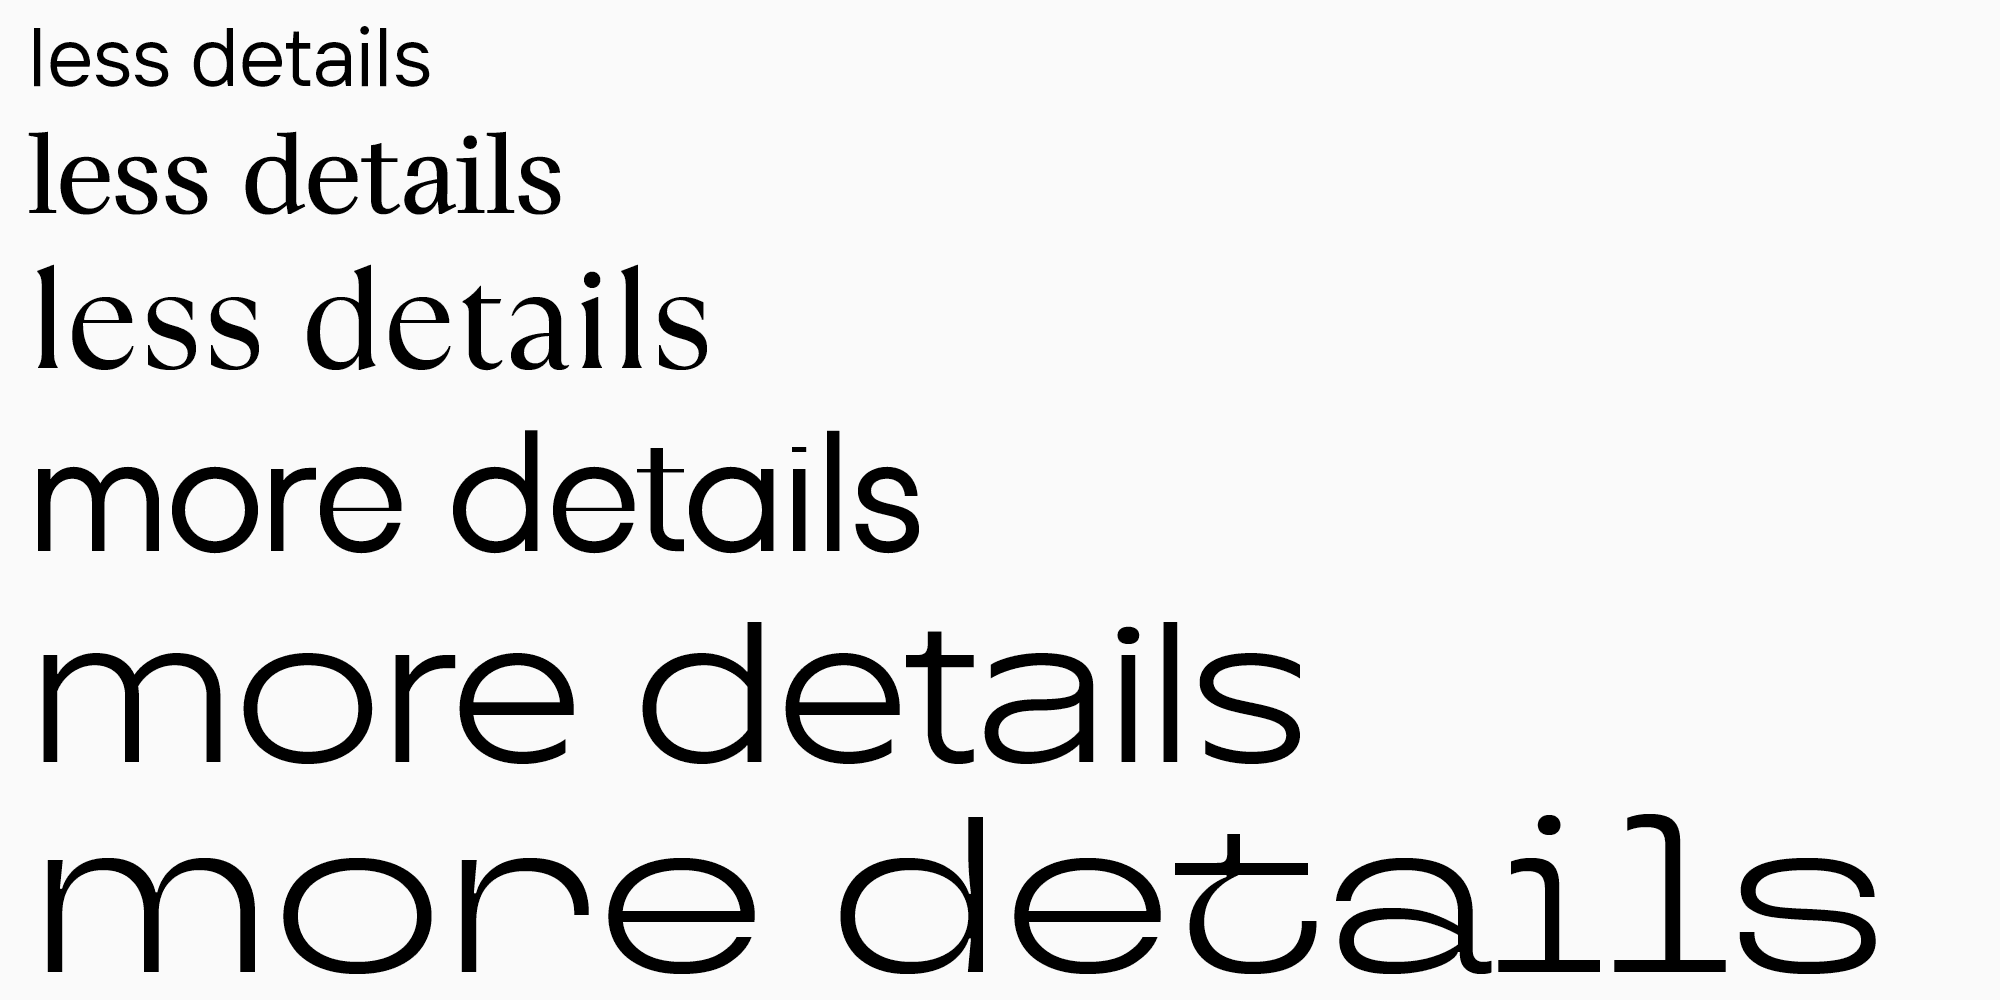
Aquí hay algunas otras características que pueden influir en la percepción de la fuente según el tamaño óptico:
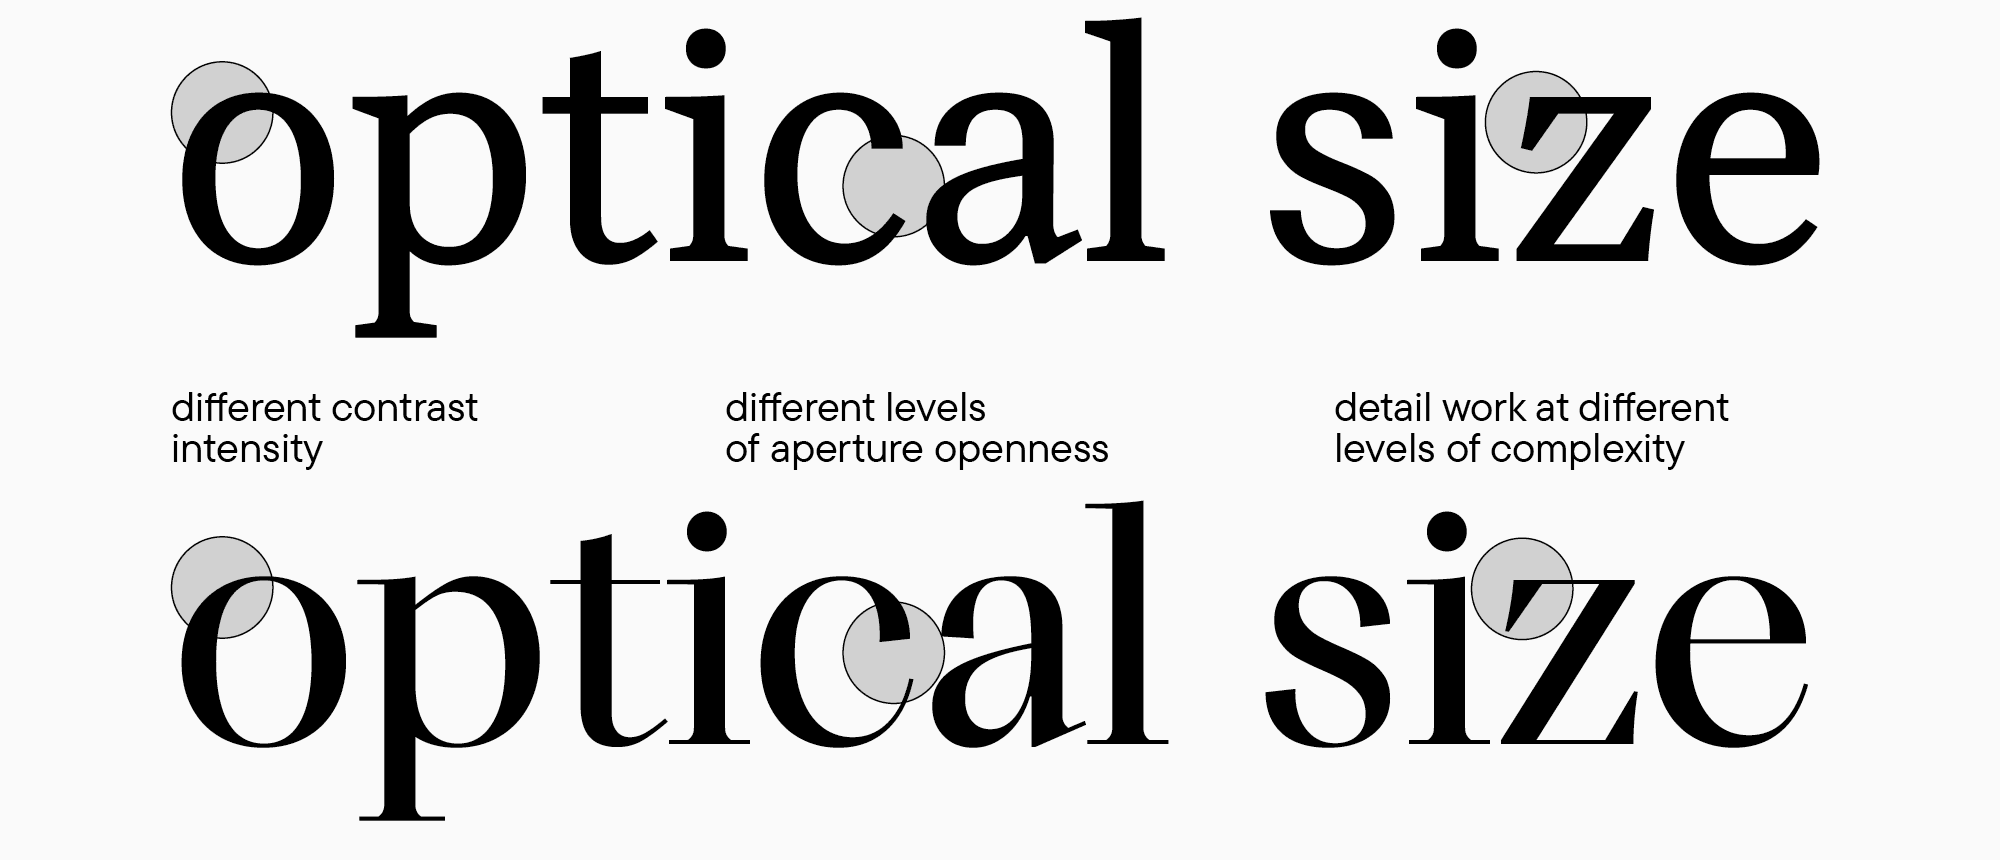
- El contraste en las serifas. Cuanto mayor sea el nivel de contraste, mayor deberá ser el tamaño en puntos de la fuente, ya que las partes más delgadas de las letras pueden no renderizarse bien en impresión o en pantalla cuando se utilizan en tamaños pequeños.
- El ancho de los glifos. Las proporciones de los glifos (anchos o estrechos) pueden influir significativamente en la imagen visual de la fuente. Por ejemplo, las letras anchas son más fáciles de percibir y leer en tamaños pequeños. Esto se traduce en la siguiente regla general: cuanto menor sea el tamaño en puntos, más anchos deberían ser los glifos (esto se refiere a las proporciones estándar y no aplica a caracteres intencionalmente estirados).
- El tamaño de los caracteres en minúscula. Si la fuente está destinada a usarse en tamaños pequeños, la altura de las minúsculas debe ser relativamente grande en comparación con las mayúsculas para mejorar la legibilidad.
- La apertura. La apertura también influye en la legibilidad, ya que las letras con aperturas abiertas son más fáciles de leer en un bloque de texto. Sin embargo, las letras con apertura cerrada tienen un aspecto más estático, lo que ayuda a captar y retener la atención en titulares grandes.
- Los detalles del glifo y el contraste pueden ser difíciles de percibir en formatos pequeños y generar ruido visual innecesario en un bloque de texto. Es importante tener esto en cuenta al diseñar los caracteres.
- El espaciado. La cantidad de espacio en blanco alrededor de los caracteres debe ajustarse según el tamaño en puntos. Hablaremos más sobre este aspecto en los próximos capítulos.
También puedes profundizar en este tema con los libros Size-specific Adjustments to Type Designs del estudio Just Another Foundry y Reading Letters: Designing for Legibility de Sofie Beier.
Las fuentes diseñadas para un tamaño específico o un&n 60a bsp;rango de tamaños pueden formar parte de la misma familia tipográfica, compartiendo similitudes en la estructura de las letras y el concepto general, pero con diferencias en los detalles. Ya contamos con un ejemplo de este tipo de fuente: nuestra moderna tipografía con serifas, que incluye estilos tanto para texto como para exhibición.
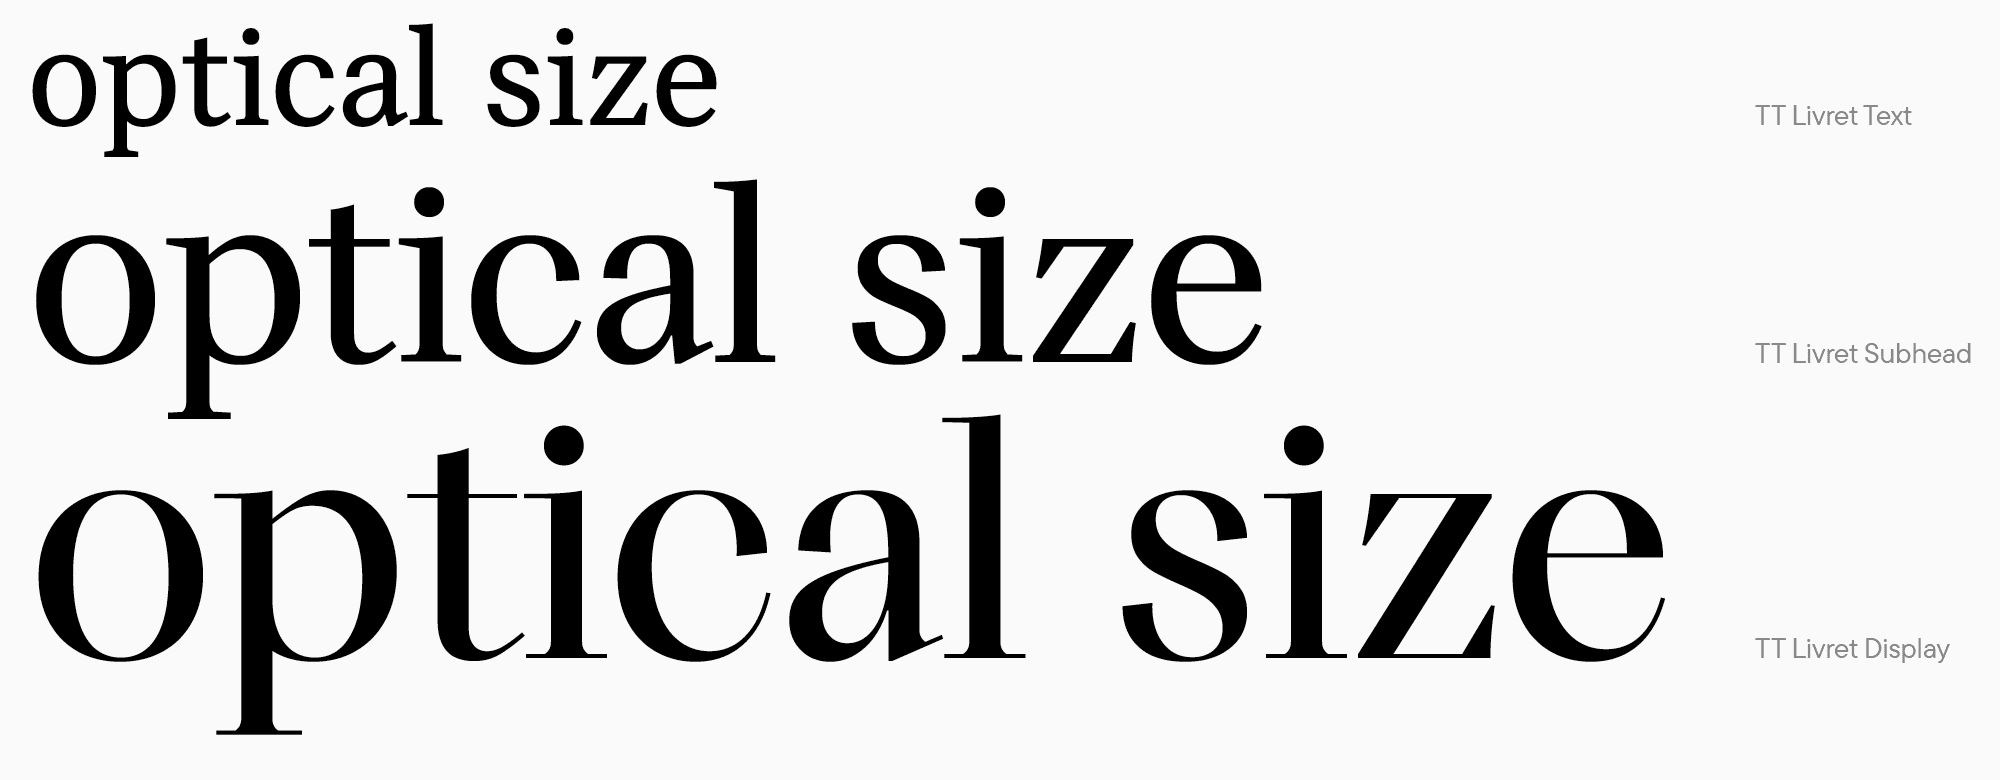
En nuestro próximo artículo de UniversiTTy, hablaremos sobre los caracteres en mayúscula y exploraremos la lógica de su diseño y sus proporciones.


